Topics in Photographic Preservation 2005, Volume 11, Article 4 (pp. 17-24)
Presented at the 2004 AIC Meeting in Portland, Oregon
Deteriorated and channeled acetate negatives present a challenge to librarians and archivists in American collections. To combat the problem conservators and others have developed treatment strategies, storage methods and reformatting procedures, but still we face an immense problem. Somewhat accidentally, as the result of a mock-disaster salvage exercise, we have developed a treatment method for deteriorated acetate negatives in which the image pellicle can be separated from the acetate base using a solution of acetone, ethanol and water. The treatment may be appropriate for images in archival collections, but is not intended for works of art. All our experimentations have been on one group of acetate negatives that were de-accessioned from an archival collection.
The treatment method allows effective, predictable and efficient separation of the image pellicle from the acetate support. After treatment, the image pellicle is stored in a Mylar sleeve, through which it can be scanned. This method is not intended to replace any other, but we are comfortable with the quality, have gone as far as we can with it, and would like to pass that information along to others.
What follows is a list of the steps we used, a summary of what we believe is going on in the process and a statement about the advantages and disadvantages of the treatment. We do not recommend that anyone try this treatment on collection material before experimenting with non-collection material.
The treatment begins by immersing a channeled acetate negative in a bath of 1:1:1 ethanol (not denatured), acetone and water; a Pyrex baking dish works well as a tray. The negative is placed in a bath, acetate side up, on a support of Silicon Release Mylar. The bath solution should completely cover the negative and the bath is then covered to retard evaporation. Before it becomes completely saturated, the negative will tend to float to the surface of the bath periodically and can be gently pushed back down.
After the negative has soaked for about two hours, the acetate layer will appear evenly opaque and whitish overall; it will have separated from the emulsion layer and cracked into pieces. The gelatin pellicle will feel soft and pliable and none of the edges will feel stiff. At this point the negative is removed from the bath. It is best to use visual and tactile clues to judge the endpoint rather than exact soaking times, because each negative will react somewhat differently.
Normally it is possible to use the Silicon Release Mylar to transfer the image pellicle onto a light table, but this movement may cause the pellicle to shift and stretch somewhat. If the negative feels exceptionally fragile, the bath solution can be removed with sponges placed along the sides of the dish. The bath solution will rise slowly into the still sponges and the pellicle will collapse onto the Mylar support with the acetate fragments sitting on top of it. During the acetate removal, it is useful to keep a small amount (about 75 ml) of the 1:1:1 ethanol, acetone, water solution in a small beaker and in a spray bottle because the pellicle must be kept wet or damp at all times during the treatment.
With the negative positioned acetate side up on the light table, it is possible to pull the gelatin anti-curl layer from the negative. It usually comes off easily, often in a single sheet. However, around the edges it may be necessary to slice between the gelatin anti-curl layer and acetate; a thinned and polished micro-spatula works well. If the anti-curl layer is not completely removed from the acetate layer, it will be difficult to separate the edges of the acetate from the image pellicle, especially along the edges.
The softened, fragmented, acetate layer will have released from the image pellicle and the fragments can be lifted off with a thin blade. Break large fragments into smaller pieces to avoid stretching the image pellicle. Like the anti-curl layer, the acetate layer has a tendency to remain more tenaciously adhered along the outer edges, but it can be released by sliding a thin blade, between the two layers. Alternatively, pivoting the fragment back over the edge will release the layers. Small fragments of the acetate and tiny strings of adhesive residue will remain on the surface of the image pellicle. Working under raking light, these can be removed with tweezers or a small, soft brush wet with the washing solution.
After the anti-curl layer and all the acetate fragments have been removed, sometimes the image pellicle will be in one, untorn piece, but more often there will be some tears and losses. If the tears are branched, it is likely that the negative will have rolled up along the edges of the tears. The most difficult part of the treatment is realigning tears and fragments and unrolling segments. Sliding a micro-spatula underneath a rolled pellicle segments will draw it flat, but if the pellicle is very wet it will immediately roll up again. A more controllable way to unroll the edges is to tear pieces of Chromatography paper into small strips or wedge-shaped pieces. These can be used to unroll and manipulate the pellicle. It works well because the Chromatography paper pulls a little bit of moisture out at the same time it shifts or unrolls the gelatin, causing the gelatin to dry out slightly and adhere nicely to the working surface. By adding and removing moisture, one can manipulate the pellicle to realign tears and replace fragments, but there is a limit to the amount of manipulation the pellicle can take.
If it is not possible to align all the tears working from one side, one can flip the image pellicle over by placing another piece of Silicon Release Mylar on top of the exposed surface of the image pellicle, turning the package over, and then removing the first piece of Silicon Release Mylar by rolling it off. This step will feel awkward at first, but after a little practice it is not difficult. If the image pellicle is slightly stretched or misshapen, it is possible to manipulate it between two pieces of Silicon Release Mylar to bring it back into shape.
When the image pellicle is aligned as far as possible, it is ready to be dried. Transfer it between sheets of Tyvek by removing one layer of Silicon Release Mylar, dropping the Tyvek onto the surface of the pellicle, flipping the package, rolling off the remaining sheet of Mylar and replacing it with Tyvek. Dry the package between blotters and boards, under weight for at least 24 hours.
When the pellicle has dried, it can be loosened from the Tyvek sheets by rolling them off, using a glass weight to keep the unreleased area flat. There will probably be some adhesive residue, which appears as an opaque, pinkish-white substance on the surface; this can be reduced with a cotton swab lightly dampened with acetone. When the image pellicle has been cleaned, transfer it to a Mylar sleeve by inserting the Tyvek sandwich into the sleeve, then pulling the Tyvek sheets out one at a time. The image pellicle can be scanned or photographed through the Mylar.
As we have experimented with this process, we have tried to develop a sense of when it works well and when it is ill advised. Negatives with severe planar distortion, 10mm or more, are not good candidates because the pellicle will stretch excessively. We have had little success getting such a pellicle to return to a rectangular shape. Likewise, we have found that negatives with many severe tears and losses, especially those where segments are completely separated, are not good candidates because other than manipulation and alignment, we have no method of reattaching the fragments. We have had good success with negatives with minor tears and losses and moderate planar distortion.
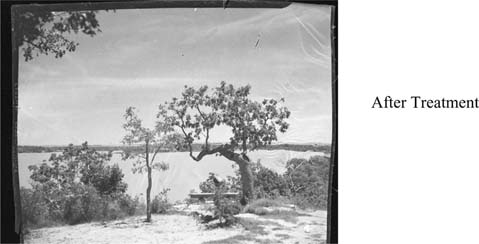
This image of Lake Worth had excessive planar distortion. The upper right corner is severely distorted and the right edge is uneven.
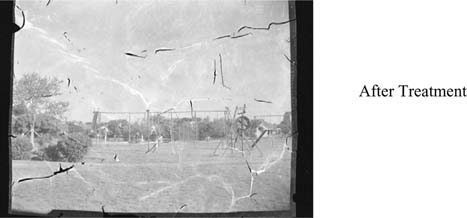
This unknown image had many tears and losses before treatment. The fragment in the upper left margin is completely detached.
A typical acetate negative, regardless of the type of acetate, is comprised of five major layers: an anti-curl gelatin layer; the acetate base; the subbing, or adhesive layer; an anti-halation layer; and the gelatin emulsion which contains the silver imaging particles. The formulation of the subbing layer plays an important role in other methods of acetate negative conservation, but is less important to this method.
The hardened gelatin of the emulsion layer is the critical element that allows this treatment to work. When gelatin is produced for photographic use, formaldehyde is added to harden it. This causes one of the amino acids in the gelatin, lysine, to cross-link, and form a cage structure. This cross-linking is extremely important once the acetate negative is immersed in the solvent bath.
Chemical solvation has four distinct stages: wetting, swelling, gelling and solvation. If the aim is to achieve full solvation, the molecular forces holding molecules to each other must be completely broken—each molecule must be completely free to move. The goal of this treatment, however, is not to completely solvate the gelatin, since the gelatin contains the silver particles forming the image, which it is our goal to preserve. The acetone, ethanol and water combine their abilities to break the intermolecular forces between the gelatin molecules, and the first three stages of solvation are reached. Fortunately, complete solvation is impossible due to the addition of the formaldehyde and the resultant cross-linked lysine molecules. The swelling stage is the most important to this method. Simply put, the chemical cocktail swells the gelatin enough that it may be physically separated from the pellicle. Since the silver particles remain entangled or “caged” in the cross-linked matrix, the image is preserved. We are grateful to our colleague, Hal Erickson, for his consult with this information.
The investigation of this treatment method began, unintentionally, during a disaster salvage exercise. In preparation for the exercise, a collection of books, manuscripts, brittle newsprint, audio tapes, vinyl albums, computer discs, photographs, negatives and anything else that might be found in an archives was dropped in a sink, covered with water, and allowed to soak overnight. The next morning, during the recovery operation, quite unexpectedly we found that the acetate negatives were swollen, the backing had cracked, but the pellicle was strong and intact. It was quite easy to separate the pellicle from the acetate fragments. A series of experiments over the next few months finally produced the method described above. The experiments began by varying the pH of the bath solution, and ultimately we discovered that a mixture of water, ethanol and acetone worked.
A number of ethical questions regarding this work come to mind immediately. The first is that we were working experimentally and several negatives were destroyed in the process. We justified this use because the negatives we used had been de-accessioned from a library collection and were destined for the trash had we not taken them.
A more significant concern is that this is an imperfect treatment. None of the illustrations used in this article have been altered beyond the original scan and the imperfections are evident. The tears are not perfectly aligned; some negatives are distorted; and the negatives swell slightly in the course of treatment, normally, to approximately 4 1/16″ by 5 1/16″. The surface of most of the treated negatives is not completely clean; there is some adhesive residue left. This is normally only a small amount, but if the pellicle has many tears, it will do more harm than good to remove the residual adhesive.
With these flaws, we originally decided not to publish this information, but two reasons caused us to reconsider. The historians and archivists to whom we showed the treated negatives were excited to have the information recovered, even with the flaws. Secondly, there may be others in the field who might be able to make use of the information about this process.
Although we have come to see this as a treatment with predictable results, others have not had the same results. In a test run we sent packages of channeled acetate negatives and a description of the process to several other conservators. Some of them had reasonable results and some were completely unacceptable. However, at least eleven conservator students at the University of Texas at Austin have successfully treated a channeled negative, although they were working under close supervision.
One advantage of this treatment is that it is relatively quick. The acetate removal normally takes between twelve and thirty-five minutes, with about seventeen being the norm; cleaning and scanning the pellicle takes about five minutes. This does not include set up and clean up time. The solvents required, ethanol, acetone and water, are not as harmful as some; we normally work in an open lab wearing respirators.
This treatment is not appropriate for the most valuable materials, and probably not for art images, where the minor details of the surface really define the image. It may have a place in archival collections, especially in the case where no other treatment options are possible. The power of the stories conveyed by these images may surpass the flaws of the treatment.
More complete instructions and illustrations for this treatment will be found on a website linked from the following web address. http://www.ischool.utexas.edu/˜pavelka
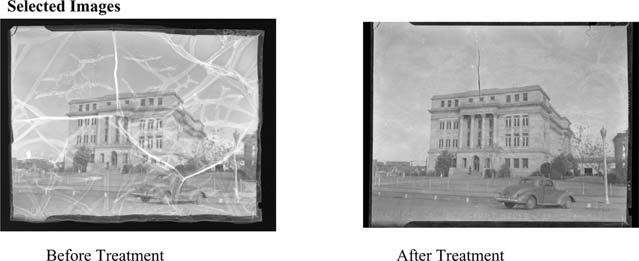
One of the negatives we treated, an image of the Stephens County Courthouse as it appeared in about 1940. Later the building underwent significant expansion with the addition one wing on either side, effectively tripling the size of the building.
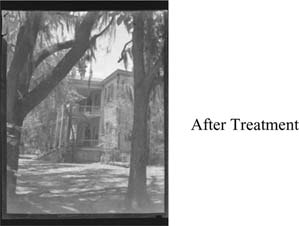
This negative was treated by a conservator student, Holly Robertson. The plantation was the home of Elizabet Ney, a sculptress who worked around the turn of the last century and produced many larger than life size marble sculptures of prominent Texas figures. Those figures now adorn the Texas Capitol among other buildings.
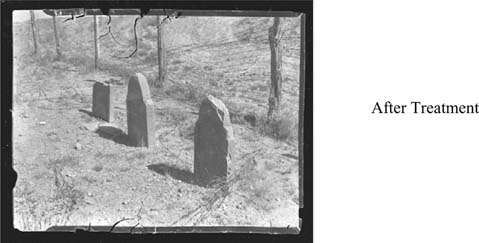
The Boot Hill cemetery is north of Amarillo. It is said that the only thing between Amarillo and the North Pole in the winter and Hell in the summer is a barbed wire fence. It is a typical West Texas frontier town and the first person buried in this cemetery was supposedly shot by the sheriff.
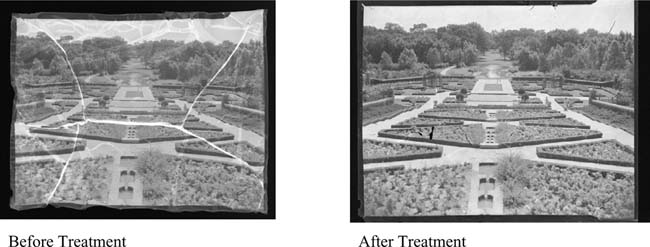
This image is the lower rose garden at the Ft. Worth Botanic Gardens. The layout of the garden is strikingly similar to what exists today.
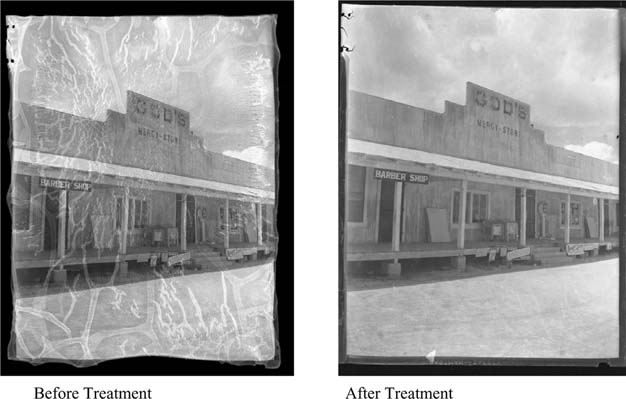
“God's Mercy Store,” began operation in Waller, Texas about 1918. Goods were marked at cost, and customers paid cost plus whatever profit percentage they felt was appropriate. Owner A. D. Purvis claimed that the store was established by the spirit of Christ which is Love, Mercy, and Self denial.” The Handbook of Texas observes that the store was still operating in the late 1920s.
Papers presented in Topics in Photographic Preservation, Volume Eleven have not undergone a formal process of peer review.