Topics in Photographic Preservation 2005, Volume 11, Article 14 (pp. 104-110)
From the very inception of photography a method for enlarging images was desired and sought. Wedgewood, and later Talbot, made enlarged images with a solar microscope. However, until the solar camera was introduced, a large photograph on paper would require a negative of equal size for contact printing. Companies such as the Autotype Company in London, England, made plates a yard square (Tissandier 164), but these were cumbersome and uncommon. Despite the difficulties involved, patrons wanted larger photographs. One observer commented prophetically: “It is supposed that the albums are now full, and that the public now intend to fill their walls!” (Welling 170). In many instances a patron might already possess a flattering Carte de Visite and would prefer to pay for a larger copy of it than to sit for something he or she might not like.
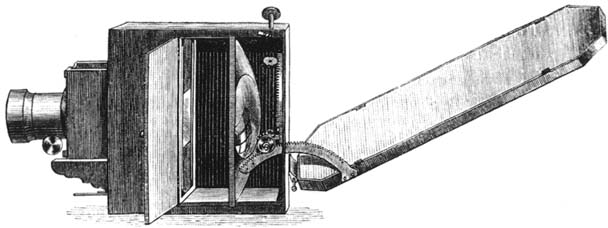
The first widely successful photographic enlarging device was called a “solar camera”. It was patented in 1857 by David A. Woodward, a professor of fine arts at the Maryland Institute in Baltimore. Woodward's camera (Fig. 1) was set up in a darkroom by an aperture in a drape covering a window (preferably south-east facing). An inclined mirror that would project from the window reflected the rays of the sun into a convex condensing lens, through the desired photographic negative, and then through a setzval projection lens to cast the final image onto an easel. On the easel was a large sheet of sensitized paper to receive the enlarged image. The solar camera came in two sizes: half-plate with a nine-inch condenser, and quarter plate with a five-inch condenser.
Fig. 1. David Woodward's Solar Camera, 1857 (Welling 122)
Woodward's solar camera required the presence of sunlight and was, in all, a time-consuming, unwieldy process. The condensing and projection lenses required fine adjustments to insure that the chromatic and spherical aberrations were minimized. Photographers knew the “sweet spot” of the lens. In addition, there tended to be drop off at the edges of the enlargement where the image would fall out of focus; and the mirror would have to be adjusted during the exposure to ensure that the sun's rays stayed properly centred on the condenser. Furthermore, the printing papers available to photographers before the 1880's, when the faster bromide paper was introduced, were salted paper and albumen that were slow and troublesome. Rather than become a fixture in every photographer's studio, the art of making enlargements with solar cameras became the domain of “solar printers”, businesses formed specifically to make solar enlargements.
There were many modifications and improvements made upon Woodward's design, both by Woodward himself and by other scientists over the following 20 years. Among the most noteworthy design improvements were those made by a Belgian named D. Von Monckhoven, and by a Frenchman named Alphonse Liébert, both in 1864. Monckhoven's model (Fig. 2) had the addition of a meniscus lens between the condenser and the negative to give more uniform illumination and to correct the spherical and chromatic aberrations of the condenser. The negative was held in a frame and the enlarging lens was held in a tube. The enlarged image was then projected onto a screen holding the sensitized paper at a distance of some yards from the apparatus.
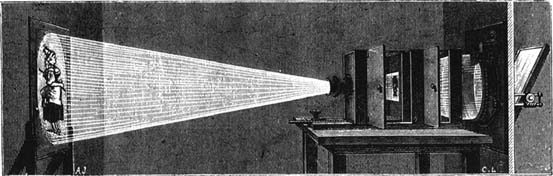
Fig. 2. Désiré Charles Emanuel van Monckhoven's Solar Camera 1864 (Tissandier 166)
All of the elements in the previously described models were arranged on a horizontal plane and had to be used in a darkroom. Liébert's model (Fig. 3) had the distinction of being a closed system that could be set up outdoors, usually on a rooftop. Further, it was manufactured with a rack-and-pinion movement so that it could be rotated toward the sun smoothly, with a minimum of vibration. A problem with both Woodward's and Monckhoven's designs was that the mirror required adjusting to maintain the sun's rays upon the condenser. The clumsy adjustments produced vibrations and a blurry exposure. Liébert's design dispensed with the mirror, but also had to be adjusted and was more easily jarred by being outside in the wind. Liébert's camera could make 17¾ × 23¼ inch photographs from a carte-de-visite-size (3½" × 2½") negative in about two hours with the papers available at that time (Osterman). This model became the most frequently used in North America while Woodward's design remained popular in France.
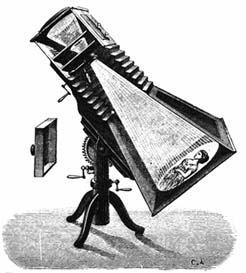
Fig. 3. Alphonse Liébert's solar camera 1864 (Welling 122)
By 1865 rooftops were the most common locations for these cameras as they could be set up to make the exposure for the required time with the least likelihood of being disturbed by people. The exposure times for these enlargements could be hours, or even days depending on the weather conditions. It was the job of an apprentice to ensure that the camera was kept pointed toward the sun, via a peep-hole set into the enlarger to view the image, following its path across the sky. The production of “life size” portraits as big as 6 × 10 feet have been recorded, and while these images were of poor quality and needed heavy retouching, they were spectacular for the period in which they were produced.
Some photographers chose to use a simpler form of an enlarger. If the photographer possessed a camera of sufficient size and a short-focus lens, or rather a lens capable of focusing at short distances, an enlargement could be made. In this case (Fig. 4) a piece of ground glass, to diffuse the light, would be placed in the window and the negative mounted between it and the camera lens. The camera would then be placed so that the centre of the lens was in alignment with the centre of the negative. This would be accomplished by looking through the ground glass of the camera. The lens would be connected to the negative box by means of an opaque tube of cloth, to create a tunnel through which the light was channeled. The piece of ground glass would be removed from the back of the camera and the enlarged image would then be cast onto an easel upon which a sensitized sheet of paper had been placed. This was only possible with faster bromide papers. Focusing was accomplished by striking a balance between the distance from the negative to the lens and from the lens to the easel. This was typically accomplished by sliding the easel back and forth.1
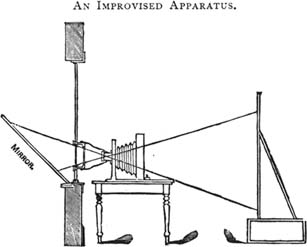
Fig. 4. An enlarging apparatus involving a portrait camera (Burbank 111)
The use of a rooftop solar enlarger followed this procedure: the paper was sensitized, tacked to a board and allowed to dry completely. The flat, dry paper could then be placed within the camera and the exposure would be made (Welling 192). If the paper were not allowed to dry completely it would continue to dry and contract during the exposure, producing an unsharp image. The production of a solar enlargement required the use of a bright, clearly defined collodion negative possessing certain properties. The size of the negative, when using Woodward's model for example, would be determined by the size of the condensing lens. If the camera contained a nine-inch condenser, a one-sixth plate (2¾" × 3¼") negative would suffice, while the five-inch condenser could take a smaller, one-ninth plate (2" × 2½") negative (Towler 262). The negative itself had to have less density than a contact printing negative, while losing none of the former's highlight detail, and containing no harsh shadows. Giving a thinly coated collodion negative a lot of exposure and then processing it slowly in a weak-developing solution would produce better contrast and density (Wilson 302). These negatives would not be varnished, contrary to the common practice of the time, as the negative had to be free from the lines and spots that this would produce.
Albumenized paper could be used in a printing-out process that required several hours of exposure to sunlight. While these papers had the advantage of producing an image as the exposure occurred and produced exceptional contact prints, they fell short when used for enlargement. In short, the duration of sunlight required to enlarge onto printing-out papers was quite impractical. Consequentially, Louis Désiré Blanquart-Evrard's salted paper process was preferred. Blanquart-Evrard's modification2 of Talbot's calotype process involved the floating of the paper on two successive baths of iodide of potassium and nitrate of silver, thereby thoroughly impregnating the paper with the emulsion and resulting in a better gradation of tone and detail (Gernsheim 238). While in Talbot's process gallic acid was used in the sensitizing, Blanquart-Evrard's process used gallic acid as a separate developing bath. This was followed by a hypo bath of several hours. The reduced exposure time in sunlight was between ten and thirty minutes, depending on the quality of the light and density of the negative.
The advent of the more sensitive developing-out bromide paper in the 1880's opened up many more options for the photographer who wished to create photographic enlargements. Bromide enlarging paper was coated with silver bromide and other salts in a gelatin emulsion, and separated from the paper by a semi-opaque coating of barium sulfate in gelatin (baryta) (Bayley 57). This paper produced cool black tones in a variety of surface textures, including glossy, semi-glossy or “carbon surface”, and matt. The most popular surface for prints was the matt surface as it could be “worked up” or coloured.
There were many problems inherent in the enlargements produced by these processes. The most serious was that whatever imperfections the negative possessed were amplified in the enlarged image. Image fading was also a concern.3 As a result many of these images were retouched, or “worked up”, to cover the blemishes and to counteract fading. There were several remedies for this including touching up of the negative itself. If it were too dense it could be treated with a reduction bath of iodine and potassium cyanide or hypo and potassium ferricyanide. At this point the negative could be retouched with graphite, and gently breathed upon by mouth to blend the graphite into the gelatin, making the negative more translucent (Albright and Lee 31).
More commonly, the final enlargement would be the subject of retouching rather than the negative. The fact that these enlargements required working up to reduce the unattractive streaks and blemishes, combined with the public's desire for coloured photographs led to these images being worked, sometimes elaborately, with coloured paints and crayons, hence the term “crayon enlargements”.4 It was very common for an artist to be on staff with the photographer to apply the needed colouring.
What began as a method for disguising blemishes on a print became an expected and sought-after feature of these photographs. By the late 1800's a photograph was considered incomplete if it was not coloured. In many instances the photograph became an under-drawing for the subsequent layer of media. Many bromide papers were manufactured with this working-up in mind. These papers were marketed with a variety of surfaces available such as “rough”, “extra rough” and “crayon” (Bayley 60). Coloured crayons, or conté, and chalks were used most frequently to tone and colour these images either alone or in conjunction with watercolours. Charcoal was not used very often because of its fragility. Methods of application included the manipulation of a “crayon sauce” by the use of stumps, cotton, fingers and various other implements (Albright and Lee 32), such as an airbrush or aerograph (Henisch 96).
Prints would be mounted to the final support before final application of retouching and colour, as these procedures were typically rather rough on their surface. If the mount were to be a flat board, prints would be trimmed prior to mounting with a very sharp knife. They would then be soaked in water, blotted, and laid recto down on a hard, level surface. The mounting medium would then be applied with a stiff brush or with a sponge stuffed into the mouth of a bottle containing the medium (Burbank 91). There were many formulas for mounting mediums. Some of the most common were: boiled starch paste, animal glue and gelatin glue.5 Once the glue had been applied, the mounting board would be affixed by laying it upon the print and pressing lightly. The mounted image would then be flipped over and rubbed with the palm of the hand or a roller through blotting paper to remove any air pockets or wrinkles and was then dried under pressure. Machines similar to a letterpress were used by some photographers to further ensure contact.6
A procedure for mounting an enlargement onto canvas was usually similar to the following: A piece of white muslin was tacked onto a canvas stretcher and coated evenly with starch paste. A wetted print was placed recto down on a rubber sheet and mounting medium was applied to its verso. The stretched canvas was then placed, recto down, on top of the print and rubbed into contact with a flat implement. The mounted print was then removed from the rubber sheet and allowed to dry (Burbank 117). When dry, the print could then be coloured.
In a period ranging from around 1880 until as late as the 1930's, crayon enlargements were sometimes mounted on convex boards. Information on the method by which this mounting was accomplished is elusive. The print itself would be salted paper or more commonly, gelatin based. The mould used was a large cast iron convex plate with a gas burner underneath. A wet mounting board would be placed upon the form and the enlargement, having been wetted and coated on the verso with starch paste, was placed on top of the mounting board and the bubbles were pressed out. A cast iron oval hoop would then be pressed down around the edges of the wet mounted image, conforming it to the convex shape of the plate. The now mounted image would be allowed to dry on the mould. This would result in a sort of “lip” around the edge of the mounted image. Quite often this lip is identified as an artifact of the print having been in its frame, when in fact it is from this mounting process. Once dry the colouring media would be applied.7
Solar enlargements are known by many names: solar portraits, charcoal portraits, sketch portraits, crayon enlargements, pastel photographs, and others. True solar prints were created using the sun as the illuminant, as in the design of the solar camera, not an electric light bulb. Many of the over painted images we see today do have a photographic base whether albumen, salted paper or gelatin. The processing and mounting of these images ranged from delicate to crude. This is reflected in the conditions of the pieces extant today. The conservation of these pieces requires knowledge of photographic processes as well as of watercolour and chalk media, and in the case of the canvas mounted prints and convex, or “dished paper” images, the ability to recognize what they are, how they were made, and how to handle them. But the potential rewards are great. Solar enlargements represent a significant stage in the history of photography and need to be carefully preserved.
Katharine Whitman
Queen's University Master of Art Conservation Candidate
Albright, Gary and Lee, Michael, “A Short Review of Crayon Enlargements: History, Technique, and Treatment,” Topics in Photographic Conservation, vol. 3, 1989, pp. 28–36.
Barhydt, J. A., Crayon portraiture; complete instructions for making crayon portraits on crayon paper and on platinum, silver, and bromide enlargements, also directions for the use of transparent liquid water colors and for making French crystals (New York: The Baker & Taylor co., 1892).
Bayley, R. Child, Photographic Enlarging: A Handbook for Amateur Photographers (London: Iliffe & Sons Ltd., 1924).
Burbank, William Henry, Photographic Printing Methods (New York, NY: Arno Press, 1973), pp. 109–131.
Crocker, J. B., A complete and comprehensive treatise on the art of crayon portraiture, in black and white, (Chicago, Ill.: The Jewellers' Journal, (1884).
Gernsheim, Helmut, The History of Photography Vol. II: The Rise of Photography 1850–1888 (London: Thames and Hudson, (1988), pp. 235–238.
Henisch, Heinz K. Bridget A. Henisch, The Painted Photograph 1839–1914: Origins, Techniques, Aspirations (University Park, PA: Pennsylvania State University Press, (1996), pp. 94, 102–104.
Hunter, Marion (2004) Personal communication. Conservator in private practice, Charleston, South Carolina, USA.
McElroy, Rob (2004) Personal communication. Photograph Conservation researcher and photo historian, Buffalo, New York, USA.
Osterman, Mark (2005) Personal communication. Process Historian, George Eastman House, Rochester, New York, USA.
Reilly, James M. The Albumen & Salted Paper Book: The history and practice of photographic printing, 1840–1895. (Rochester: Light Impressions Corporation, 1980), Chapter 1.
Towler, John, The Silver Sunbeam (London: The Fountain Press, 1969 reprint of 1864 ed.) pp. 157–158.
Welling, William, Photography in America: The Formative Years 1839–1900 (New York: Thomas Y. Crowell Company, 1978), pp. 122–123, 192–326.
Wilson, Edward, Wilson's Photographics, (New York: Arno Press, 1973 reprint of 1881 ed.) pp. 301–315.
1 There is an inverse relationship between these two distances: the shorter the distance between the negative and lens, the longer the distance between the lens and the easel in order to maintain focus.
2 There were many variations of Blanquart-Evrard's process available. An example (Towler 263) was a bromo-iodizing bath of gelatin, iodide and bromide of potassium and exposure to hydrochloric acid vapours and sensitization in nitrate of silver and nitric acid. After exposure development would be done in hyposulfate of soda with a water wash and final bath of dilute hydrochloric acid to remove yellowing. After a final wash in clear water the print would be allowed to dry.
3 The Photographic Society of London set up a Fading Committee in 1855. It was somewhat understood that keeping photographs in a dark place such as an album would serve to reduce the speed at which a photograph faded, but patrons wanted to display their photographs. Hence hand colouring also served as a method of reinforcing the image. (Henisch 10)
4 There should be a distinction realized here. Solar enlargements are enlargements that may have retouching, but not colouring. Crayon or charcoal enlargements are solar enlargements that have had coloured media added to the surface, many times completely obscuring the photograph. Some crayon portraits were created free hand. That is, without the photographic base. The image would be projected upon the screen and the image would be traced. “McCallister sold a “Wonder Attachment” for their magic lantern which allowed the crayon portraitist to project an image directly from a customer supplied cabinet card.” (McElroy)
5 Gelatin glue was popular in that it did not cockle prints and would keep indefinitely, needing only to be heated up before use. Shellac in methylated spirit was also used as a dry mount with heat. But it was not as popular as some papers would soak up the mixture when it was heated and become stained. (Burbank 92)
6 A 1931 “Photographic materials” mail order catalogue lists the “Portable Print Press: taking the place of the cumbersome letter press. …the compression of the prints is obtained by the boards being drawn together by the leverage principle… The 12 × 15 in. press could handle any size prints up to 11 × 14 in."
7 These prints were typically not on the high end of the photographic market. They were mounted on very short fibred boards, to allow for ease of shaping and were not always of high quality artistically. Traveling photographers were known to go door-to-door selling the service of enlarging a patron's carte-de-visite and mounting it in their beautiful convex frame (the real selling point was the frame at $20, whereas the print was only $1). They would take this small photograph back to their studio and make the enlargement and return it to the customer. (ref. Hunter) The Pendleton, Oregon newspaper from the 1920's has a series of stories of scam artists called “Drummers” which posed as traveling photographers selling these convex enlargements. They would take the customer's photograph, money and never return. (ref. Robinson)
Papers presented in Topics in Photographic Preservation, Volume Eleven have not undergone a formal process of peer review.